How to insert a row in google docs, how to insert row in google docs shortcut, how to insert row in google docs, how to insert row in excel shortcut, how to insert row in word, how to insert row in google sheets, how to insert row in excel with formula, how to insert row in excel with keyboard, how to insert rows and columns in excel, how to insert emoji in outlook, how to insert a check box in excel, how to take a screenshot,
When it comes to creating professional documents using collaborative tools, Google Docs stands tall among its peers. This cloud-based platform makes it easy for multiple users to work on a document in real-time, without worrying about version control. One powerful feature of Google Docs is its table functionality, which allows users to organize data in an easy-to-read format. In this post, we will explain how to insert a new row to a table in Google Docs, step-by-step.
The Importance of Tables in Google Docs
Tables are an essential feature of Google Docs, particularly for users who frequently work with data. Tables appear in a structured format with rows and columns, which makes it easy to organize information in a clear and concise manner. With Google Docs, creating a table is just a few clicks away. As users input data within the table, it expands with each additional row. However, if you need to insert a new row in the middle of a table, you may encounter a few challenges. We will address these challenges in the steps below.
Step-by-Step Guide to Adding a Row to a Table in Google Docs
The following are the steps to take to add a row to a table in Google Docs:
Step 1: Select the Table
The first step to adding a new row is to select the table. Users can select the table by clicking anywhere in the table's borders. When a table is selected, users can see a horizontal line above the first row and a vertical line to the left of the first column.

Step 2: Insert the New Row
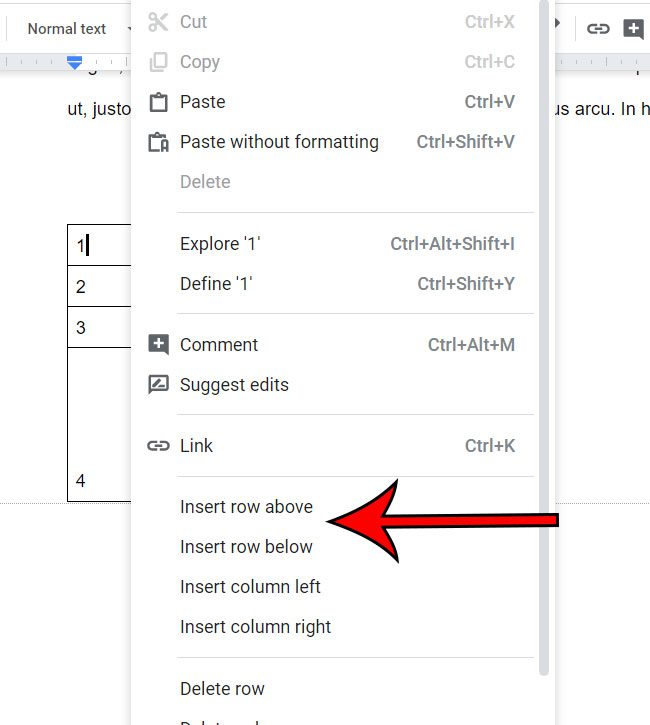
After selecting the table, move your cursor to the row you wish to add a new row to. If you want to add a new row above a specific row, click on that row. If you want to add a new row below a specific row, click below that row. After positioning your cursor where you want to insert the new row, right-click and select the "Insert row above" or "Insert row below" option.
Step 3: Edit the New Row
After inserting a new row, users can enter new data into the cells within the new row. Users can also copy-paste data from the previous row or other sources. If users want to make changes to the new row, they can also do so by right-clicking and selecting options such as "Delete row" or "Merge cells."
Conclusion
Inserting a new row in a table within Google Docs may be tricky at first. However, Google's intuitive user interface and step-by-step guide makes it straightforward for users who wish to add a new row to an existing table. Tables can help users organize data in an easy-to-read manner, which is essential when working with large amounts of information. Users should familiarize themselves with Google Docs' table functionality to take advantage of all the collaborative features Google Docs has to offer.
Also read:
.Popular Posts
-
Happy new year speech, zelensky new year speech, putin new year speech, biden new year speech, happy new year, chinese new year, happy new y...
-
Spiderman skin for minecraft, classic spiderman minecraft skin, spiderman minecraft skin download, is spiderman in civil war, marvel civil w...
-
Vba word delete page, delete a page in microsoft word, delete page in word document in windows 10, delete page in word document online, dele...


